
This support article is a part of our series on troubleshooting form designs. See the bottom of this article for the other parts in this series.
When testing your forms, you may find an error, fix the error, and then re-upload the updated form. It can be frustrating to start over and re-enter all of your test data, especially for longer forms. Luckily, SurveyCTO can save your form progress, even across different form versions.
1. Saving and resuming form progress
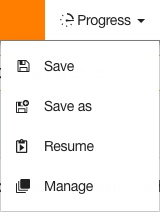
Before you close the test view and upload the latest form definition, on the orange toolbar at the top, click Progress, then Save.
From there, you can give the test form instance you are working on a name, and save it.
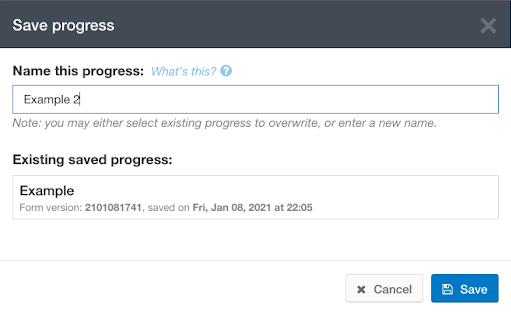
Then, when you upload the latest form definition and open the test view, it will open that saved test form instance!
These are the options in the Progress menu:
Save: Save the current test form instance. If you are working from an opened test form instance, you will save to that instance.
Save as: Save as a new test form instance so you do not overwrite the one that is currently open. (Will only appear after resuming a previously saved test form instance.)
Resume: Load the data from a different, previously saved test form instance.
Manage: Resume or delete previously saved test form instances.
It can be helpful to save multiple test form instances with different types of data, such as test instances where fields have different values, and different fields are relevant.. That way, if you upload a new version of the form, instead of needing to re-enter all of the test data for each test, you can just Resume a test form instance. You can then make sure the form still works well with the updated form definition.
2. Updating the form
Once you know how to save your progress, you can update your form definition without losing progress.
2.1 Using the online form designer
You can switch back-and-forth between the online form designer and the Test view using the toggle switch in the upper-right.
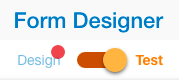
If you see a red dot next to Design on the switch, or on the Save menu in the online form designer, it means the form has been updated, but not yet saved. Be sure to save it so you do not lose any recent changes.
If you edit the form design using the online form designer, when you return to the Test view, this orange bar will appear at the bottom:

When you click that bar, it will even prompt you to either Save your progress so it will reload with all of your test data, or Don't save so you can start with a fresh, blank form.
2.2 Uploading updated form version spreadsheet
If you are working from a spreadsheet form definition (such as in Excel or Google Sheets), you can still upload the latest version to the server, and then continue testing with the new version. To do so, follow these steps:
- Optional: Save your progress, as described above.
- Click the Design/Test switch in the upper-right to go to the online form designer.
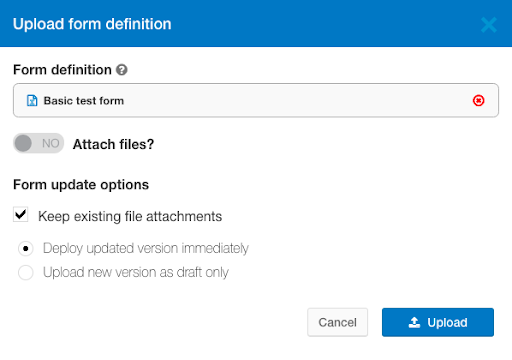
- On the top, click Upload.
- Select the spreadsheet form definition file from either your computer or Google Drive. If you previously uploaded the form definition using Google Sheets, it should already be there.
- Optional: If you are not ready to deploy the form, select Upload new version as draft only.
- Click Upload at the bottom.
- If you receive a prompt from Google, confirm your sign-in.
- At the popup, click OK. The page will then refresh.
- If the popup says there are errors in the form definition, you will have to resolve those errors, and then re-upload the form definition.
- Once the page refreshes, click the Design/Test switch again to return to the test view.
- Optional: Resume a saved test form instance.
More on troubleshooting form design
When you are ready, you can check out the other articles in this series on troubleshooting form design.
- Intro and using the test view: Why it is important to test your forms, and how to use the test view options.
- Saving and resuming progress: How to save your test progress so you can use it in the updated form definition without needing to start over.
- Using the form inspector: Using the form inspector to find errors in your form.
- Submitting test data: Ensuring data is correct when submitted to the server.
- Test view toolbar and other tips: Other details on the test view and form inspector not covered in the other parts.
Do you have thoughts on this support article? We'd love to hear them! Feel free to fill out this feedback form.
0 Comments