
This is part of our guide to computer-assisted telephone interviewing (CATI). If you have not read it, we recommend that you read the CATI sample workflows guide first. This article is accompanied by the sample forms, dataset definitions, and sample data in this folder.
1. Overview
The basic case management sample workflow is designed to demonstrate concepts. For simplicity, it doesn’t take into account more complex and realistic scenarios. If you’re a SurveyCTO and CATI beginner, start by testing and understanding this workflow. Otherwise, for a more complete solution, we encourage you to try the advanced CATI sample workflow.
In this CATI sample workflow, you’ll be able to:
| Have one phone number per respondent | |
| Call the respondent using SurveyCTO Collect | |
| Reschedule the call for a specific date and time | |
| Track the number of contact attempts made so far (and close the case after 3 attempts) | |
| Register the status of the last contact attempt |
2. Workflow components
There are two ways to set up CATI: with case management, and below. You can find the case management CATI sample workflow files in this resource folder, and the non-case management CATI files in this resource folder. Here are the names of the files you need:
| Component | Case management | Non-case management | |
| Form definition | CATI starter kit sample form | Basic CATI starter kit sample form (non-case management) | |
| Field plug-ins | phone-call.fieldplugin.zip | phone-call.fieldplugin.zip and table-list.fieldplugin.zip | |
| Server dataset definition | cases.xml | respondents.xml | |
| Server dataset records | cases.csv | respondents.csv |
Learn more about each of these components in the CATI sample workflows guide, and follow these instructions to deploy them on your server console.
3. Key elements across approaches
| Case management | Non-case management | |
| Unique identifier | The unique identifier is stored in the ”id” column of the cases dataset and "caseid" field of the form.
Using the caseid field type, the unique identifier is retrieved and stored automatically based on the "id" value of the case selected via the Manage Cases menu. |
The unique identifier is the “id_key” column of the server dataset (to be indexed for faster look-ups), and the field “id” of the form.
The unique identifier is stored by the "id" field from the "id" server dataset column by loading multiple choices from the server dataset "respondents" (webinar). |
| Searching for cases | The table under the Manage Cases menu is a direct feature of case management on SurveyCTO Collect.
It can be customized on the Design tab of your SurveyCTO server console by clicking on the Settings button of your cases dataset. |
The table at the beginning of the form is constructed using the table-list field plug-in (field: “id”).
Row content can be customized by changing the data stored in the column of the server dataset used for choice labels. In the sample setup, the choice list "respondents" uses the "respondent_details" column of the "respondents" server dataset to load the choices. Make sure the content of that column follows the requirements of the table-list field plug-in. |
| Assigning Users to cases (optional) | You can automatically assign cases to users by placing configured usernames into the “users” column of your cases dataset. | You can assign cases to users by filtering the table display using the search() function so enumerators only see cases where their username is in the "users" column (field: “id”). |
| Closing cases | Using the above direct feature, by updating the "users" value of the row to the value "Closed” (field: “pub_to_users”), the case will disappear from the Manage Cases menu, since there is no user with the username “Closed”. | The form uses the "now_complete” column of the server dataset to filter out cases, again with the search() function, so that only cases that have a "now_complete" value of ‘No’ will appear (field: “id”).
Note: The search() function can have up to two filters, so you can combine both filters mentioned above to display 1) open cases that are 2) assigned to a specific user. |
4. Understanding the workflow
Between the form design and cases dataset, there are a lot of moving pieces. A write up comprehensive enough to discuss each part that is important would be very long, so instead of a detailed write-up, we're providing some notes to help you understand both.
To understand the form and cases dataset publishing workflow, we suggest you pay attention to the following:
- In the form design, each of the calculate fields is annotated in the label property. These annotations are intended to provide you with descriptions of what’s happening behind the scenes, since the label will not show up in the actual form for a calculate field. Read through these descriptions to understand what each field does.
- Use the form inspector to test your form, and analyze submitted form data (which you can view in exports) to help you understand the final result of each of the calculations in the form.
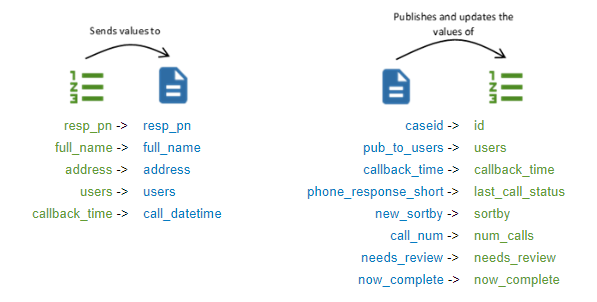
- To understand the relationship between the form and the cases dataset (see image below):
- Under the cases dataset's title on the Design tab, click on the hyperlinked form name following Published from. This reveals the field mapping, which is a list of published form fields (on the left) that will publish into server dataset columns (on the right).
- Analyze the cases dataset's contents between form submissions to see what changed. On the Design tab, click on the Edit button of the cases dataset, and you'll see a table of all server dataset data. These can be edited right here. Alternatively, you can also click on Download > Download data to export the cases dataset in CSV format for outside viewing.
| The server dataset is attached to the form, which allows the form to pull in any values using the pulldata() function. | The form is set to publish into the server dataset. This means that the above fields on the left are published whenever a submission is sent to the server. |
4. Things you may want to customize
CATI systems can be complex, and everything in this starter kit is customizable. However, here is a short, non-exhaustive list of things you might consider changing in the existing form design:
- The value in the "stop_at" field is the maximum number of calls to be made, before declaring a respondent unreachable. It is set at 3 now, but you can revise it upward.
- The "reschedule_no_ans" field sets the default callback time if no appointment to call back was made. Right now that date and time is calculated to be the day after that call attempt was made at 9am.
| Note: 9am is stylized as 09-00 instead of 09:00 so that when editing the CSV in Excel, it is not auto-formatted by accident. |
- Considering that phone surveys can be easily cut off at the middle of the survey, either due to respondents’ availability or network connection, you may want to design your form to accept incomplete interviews.
Do you have thoughts on this guide? We'd love to hear them! Feel free to fill out this feedback form.
0 Comments