
This article is a supplement to our product documentation on Publishing SurveyCTO form data to Zapier.
Zapier is an excellent service for linking some of your favorite applications, and it can be used to connect SurveyCTO with a wide variety of services. What if you would like SurveyCTO to publish to an Excel workbook stored in OneDrive, send a message in Slack, post a Tweet, create a Salesforce opportunity, or one of hundreds of other tasks? A Zapier connection can help you do that!
Check out the Zapier website to learn more. To learn the basics of Zapier, check out their starter guide.
Setting up a SurveyCTO-to-Zapier connection
You will need to setup one connection in SurveyCTO for each Zap (Zapier tool for automating a task) you would like to create, even if those Zaps are for the same form. You only need to add the app to Zapier once per form.
1. Setup in SurveyCTO
You will have to do this once per Zap, even if each Zap is for the same form.
- Navigate to the Export tab.
- On the Export tab, enable the cloud publishing section (scroll to Advanced: publishing form and dataset data to the cloud, and set the switch to ON (blue). If you cannot enable publishing features, speak to the admin on your server.
- Scroll to the form you would like to connect to Zapier, and click Configure.
- In the box that appears, click + Add Zapier connection.
- Enter a name for the connection. Think of a name that identifies the form you're working with and the purpose of the Zap. For example, if you plan to use this connection with Gmail, you can call it “Gmail connection for [NAME OF FORM] receipts”.
- Select the publishable fields you would like published to Zapier, or choose the option to publish all fields.
- Optional: You can add a hyperlink and a text summary (see below for more information), and publish existing data.
- Click Save and continue.
- Click on the button to copy the API key, which you'll need for the next steps. You can always return to the Export tab, click on Configure for the same form, and click on the Account API key... link to copy the key again.
| Tip: There's no harm including fields from the SurveyCTO side that you don't anticipate needing on the Zapier side. If you publish all fields in a relatively small form, you don’t have to include all of them in the actual Zap, but if you don't include the form field from SurveyCTO and you need it later for a Zap, you'll need to edit the connection on the SurveyCTO side to use the field in Zapier. |
Hyperlink (optional)
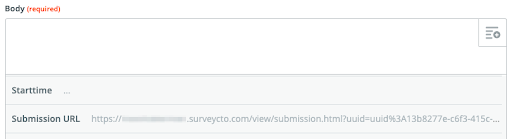
When you checkmark Include hyperlink to submission details?, one of the fields you can add to Zapier will be the URL to that submission in the Data Explorer. Its name will be what you entered for Field name for hyperlink in the SurveyCTO console but with some letters capitalized, and spaces instead of underscores. The default name is submission_url, and as you can see in the sample above, the Submission URL gives the URL of the submission.
Text summary (optional)

This is additional data you can include about the submission, and it can say just about anything you’d like. It can even include field values. In the sample above, the JSON text was specified as “For the crop options, ${name} grows the most ${grow_most_name}.” When the Zap actually receives a submission, it will show the actual respondent name and crop name.
By default, the summary text appears as a field called text (shown as “Text” in Zapier), but you can call it whatever you’d like.
2. Setup in Zapier
You will do this once per SurveyCTO form. Skip this part if the form is already listed on the Zapier My Apps page.
- Open the Zapier My Apps page (you'll need to log in).
- On the top-left, right under Connected Accounts, click on the dropdown menu.
- Search for and click on “SurveyCTO”.
- A window will popup asking for the API key you copied in part 1, step 9. Paste this key, and then click the orange Yes, Continue button.
- The connection will appear in the list. Its name will be “SurveyCTO”, followed by the form ID, followed by the username of the SurveyCTO account in parentheses. If you would like, you can click on the name to change it.
3. Create the Zap
You will perform these steps each time you would like to create a new Zap, even if each Zap is for the same form.
Alternatively, you can get a quickstart with a Zapier template for SurveyCTO! Visit the SurveyCTO app listing on the Zapier webpage, or jump to the Zap Templates section below.
- On the Zapier website (you'll need to log in), click on the orange Make a Zap! button on the top-right.
- Note: Your connected apps may not be available if you go right to https://zapier.com/app/editor/, so it is better to click on that orange button instead.
- Under Your Apps, select “SurveyCTO”.
- The app and trigger will be automatically filled in. Click the blue CONTINUE button.
- Click the dropdown menu under SurveyCTO account.
- When it loads, select the name of the form connection.
- Click the blue CONTINUE button.
- Click the dropdown menu and Connection Name, and select the name of the connection on top. The name will be what you gave it when you set it up on the SurveyCTO server console. There can only be one connection per Zap.
- Click the blue CONTINUE button.
- Click TEST & CONTINUE.
- A new module will be created. Continue through and complete the Zap.
Note: When you go to select the fields that will be published to the connected app, there will be many fields available. However, only the fields you checkmarked in part 1, step 6 will be successfully published. If you would ever like to publish additional fields, be sure to first go back to the Export tab to add them there.
Use Zapier templates to get started faster
While you can use the listing of web services in Zapier's library of apps to create most automations between apps, in a bid to save you time, we have built a suit of Zap templates to help you get started faster. Templates help speed up common use cases, and serve as examples of what's possible. Below are a few examples, but please look at the SurveyCTO app listing on the Zapier webpage to see all the templates.
Do you have thoughts on this support article? We'd love to hear them! Feel free to fill out this feedback form.
0 Comments