
This is the fourth part in a series of articles on integrating with Microsoft Power BI. Please read the introduction before reading this part. This part focuses on how to publish data from SurveyCTO into Power BI via Excel using Zapier, a web automation tool.
Introduction
From SurveyCTO, there are a few ways to get your data into Microsoft Excel for reviewing and analysis. On the other side, Power BI offers several options to import Excel data to create Dashboards and Reports. Some are more automated than others, but each has its own value:
- Export data in CSV format via the Export Tab or SurveyCTO Desktop and import it in Excel (or skip Excel and import CSV directly into Power BI).
- Merge your form data into an Excel file with SurveyCTO Desktop. SurveyCTO Desktop's export folder (where you'll find this Excel workbook) can be located in a folder backed up to OneDrive, for easier connection to Power BI. However, updates to the data in Power BI will require running SurveyCTO Desktop locally on your computer, which is why this guide doesn't focus on this (but this might be fine for your use case). You can mitigate somewhat by combining this feature with Running SurveyCTO Desktop on a schedule.
- Publishing your form data to Zapier and send this data into an Excel file stored online.
In this guide, we will focus on the connection described in point 3 above (SurveyCTO -> Zapier -> Power BI), for the most automated workflow. We’ll show you how to:
- Configure a SurveyCTO - Zapier Integration
- Make a Zapier "zap" that updates an Excel file with new submissions
- Get Data from an Excel file in Power BI (Desktop or Service)
Configure SurveyCTO - Zapier
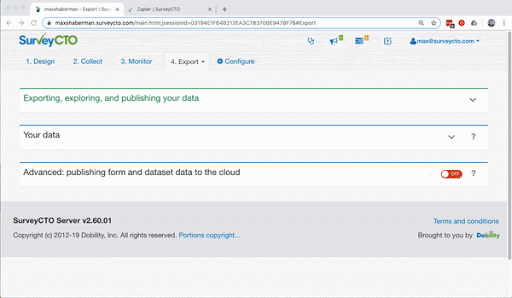
- Follow these steps to configure publishing on the SurveyCTO side and add SurveyCTO in Zapier:
- In Zapier, connect your form and follow the directions to finish configuring the Trigger part of the zap:

Make a Zap that updates an Excel file with new submissions
At this point, you will have connected your form to Zapier, having nominated fields to publish as part of the process. You also will have configured the first part of a zap, choosing the SurveyCTO connection specific to that form. What you need to do now is add a connection to an Excel file:
- In OneDrive (or a folder that is backed up to OneDrive), create an Excel file with column header names for the SurveyCTO form fields you want to publish into Power BI. If you are going to use Find Row in Zapier later (more info in step 4), be sure one of the columns is for a unique identifier of the submission.
- In Zapier, click + Add a Step and choose Action/Search.
- Select Microsoft Excel for your Action App.
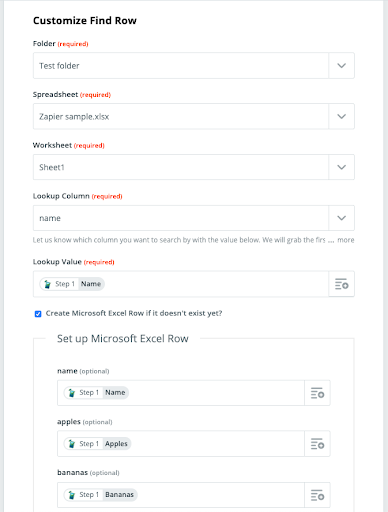
- Then, choose any Action that fits your project: 1) Update Row; 2) Add Row or 3) Find Row. This guide will focus on the last option. Zapier will receive new submissions and check in the Excel file for an existing submission with the same ID. If there is, it will update a row, otherwise it will add a row (we’ll get into how it adds a row later in step 6).
- In the step Choose account, you’ll need to connect Zapier with your Microsoft Account.
- Next, in Set up options, you will:
- Specify the folder that has the file. By default, it will select the top-level folder of OneDrive (the "root"). You will need to use the dropdown menu to select the folder that contains the Excel file, if it's not in the "root".
- Select the Spreadsheet dropdown, and select the correct Excel file.
- Select the correct sheet in Worksheet (in Excel, the default is usually Sheet1).
- If you chose Find Row (step 4):
- Specify the Lookup Column, which is the name of the column in the Excel spreadsheet that will contain the unique identifiers.
- For Lookup Value, select the form field that contains the unique identifier.
- Make sure you check Create Microsoft Excel Row if it doesn't exist yet? to add new rows for new submissions.
- Test the Zap and turn it on.
Note: As part of testing, a row of data containing ellipses will be created in the first row beneath the column headers in your Excel file. You can delete this row.
Get Data from an Excel file in Power BI (Desktop or Service)
This is the only integration in our guide where we can use both Power BI Desktop and Power BI Service. We will illustrate below the first case, but if you prefer Power BI Service (online), this article describes the steps for you.
- Ensure the Excel file in OneDrive to which you are publishing the form data is available in File Explorer. Note: When you sign into a computer with a Microsoft account, it may automatically sign into OneDrive for you. Some computers will only allow the linking of one personal Microsoft account at a time, so you may want to sign into your computer with the account that has access to the Excel file.
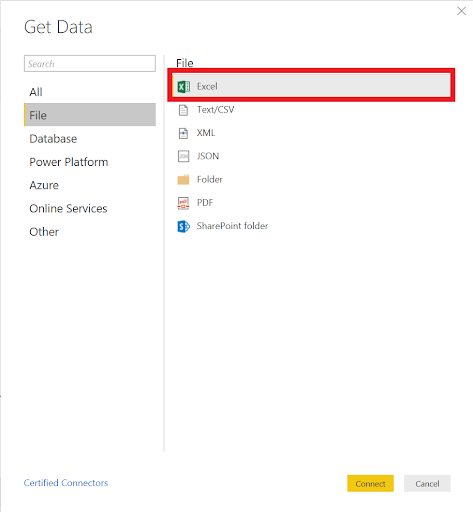
- Open Power BI Desktop and select Get Data from the Introduction Window. Otherwise, go to the Home tab and click on Get Data (select the symbol, not where it says Get Data with the arrow).
- Click on File and choose Excel, then Connect:
- Select and open the Excel file created earlier, stored in OneDrive, from the File Explorer window which opens.
- On the left, checkmark the box(es) of the sheets you would like to load, the select the yellow Load button.
- From here, you’ll be able to create Reports and Dashboards using the dataset imported via API Request. Whenever you want to refresh your tables and graphs so that they’re all illustrating the latest data stored in the Excel workbook (updated from your SurveyCTO server), click on Refresh in the menu bar:
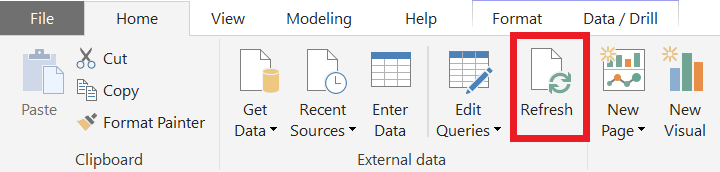
Clicking Refresh will run your script, which will get the latest data in your Excel file. Your dataset will be updated, as well as all associated graphics and tables. You can learn more about refreshing in these help topics from Microsoft:
- Refresh a dataset from a local Power BI Desktop file
- Refresh a dataset from a cloud Power BI Desktop file
Additionally, if you have OneDrive for Business, and you would like to have all the flexibility of Power BI services while working in Excel, learn more here.
There are two other options that we have documented for integrating with Power BI. Click here to view part five of this guide on integration using R.
Do you have thoughts on this support article? We'd love to hear them! Feel free to fill out this feedback form.
0 Comments