
This article accompanies this sample form. Please read the following and test the sample form. Either save a copy of the sample form in your Google Drive or download as an Excel workbook.
Introduction
You might have already seen our article showcasing the "No go back" programming method, which demonstrates how to make a question, or set of questions, invisible after they've already been answered. If not, you should have a look, it's a useful technique and might give you some ideas for your form design even if you don't need to use this exact method. If you decide to use the method described below, take note of the limitations section below before using it in a form.
How to implement in the spreadsheet template
In contrast to hiding previous responses, you might have a case where you want earlier responses to remain viewable while preventing users from changing their existing responses. You can do this by using an expression in the read only column on the survey sheet for a field in the spreadsheet form design template. (If you are using the Online Form Designer, see the instructions at the bottom about how to proceed). It is also possible to put an expression in the read only column for an entire group, but this should be used very carefully, if at all. We always advocate extensively testing your forms before using them for active data collection, but it is even more essential to do so when using more advanced techniques like these.
The expression should reference a field which comes after the field you want to make read only. For example, let's say your form has two questions called 'q1', 'q2’, and you want 'q1' to become uneditable after 'q2' has been answered. To do this, put the following expression in the read only column of the survey sheet for the field, ‘q1’:
${q2} != null
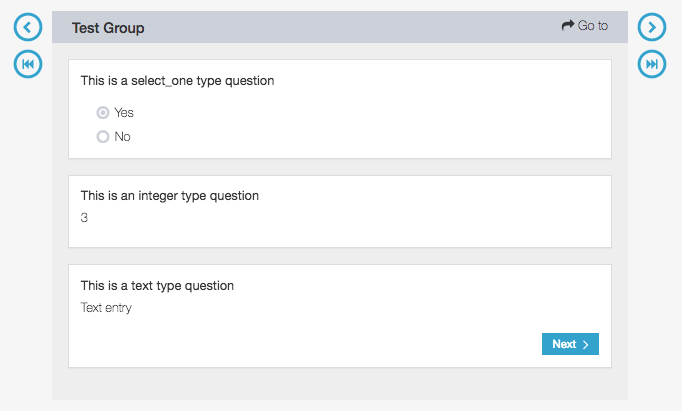
"Null" (which should be lowercase) is another way of saying “empty” or “has no answer”. So what this expression does is instruct SurveyCTO that 'q1' should be read only when 'q2' is not blank. If you enter a response into 'q2' and swipe back to 'q1', you will see that the response area will be grayed out and not editable but the information you entered before will still be visible. Take a look at the web form screenshots below. Notice that in the first screenshot the answer options for the select_one question are black, but in the second screenshot they are grayed out, and notice that for the integer and text type questions, the entry box is no longer visible in the second screenshot. These are visual indicators that a question is read only.

Normal editable fields in a web form.
Read only fields with answers grayed out.
You can take a look at an example form here (also linked above). The example includes two fields that are made read only by the third. This is to demonstrate how a read only field looks with a multiple choice question compared to a question where the user entered an open text response.
If you are using the online form designer
If you are using the online Form Designer, you will need to download a copy of your form into Excel or Google Sheets. We consider read only to be advanced functionality, and given that it is not a commonly used feature, it only appears in the Excel/Google Sheets templates.
Step 1 - Download the form
To download your form in either the Excel or Google Sheets format, click on the Export button in the upper-right corner of your Form Designer to save a version in Excel or Google Sheets format.

Step 2 - Edit the form
Once you’ve downloaded your form, open it in Excel or Google Sheets. If you are new to this format, have a look at our help topic introducing our templates and about less commonly used field properties. Each row corresponds to one field, or grouping or repeating instruction, and you need to find the fields you want to make read only and insert the necessary expressions in the read only column for that field.
Step 3 - Upload the form
Once you’ve added the necessary expressions, you can upload that Excel file or Google Sheet back to your online form designer and continue working in the Online Form Designer if you so chose. To do that, go to your Design tab, find the survey you are updating, click on the Upload button, under Please choose a form file to upload, click on +Select file and choose the file on your computer (or from Google Drive) and upload it. Once you’ve uploaded this newer version of your form, you can click on the Edit button to open the Online Form Designer and continue working there if you prefer.

Limitations
This form design approach involves some risks, which is why we encourage careful testing. Non-linear completion of a form where the fields require answers can lead to blank form instances which are impossible to submit, so this risk must be anticipated and planned for. This risk exists in the sample form that accompanies this article.
Because each field is made read only in the design based on the field that follows taking a value (becoming no longer equal to "null"), if that subsequent field were to take a value before answering the current field, if it was required, it would be in a state where it a.) requires an answer, and b.) cannot be answered. This will present as a seemingly impossible scenario for the user to resolve.
Strictly, it is resolvable though: the field in the read only expression must become equal to "null" again, so if you were to remove the answer (erase it, or long-press and choose to remove the answer), the required and unanswerable field will become editable again. You may not want enumerators to know this, and even if you did, it is a bit complicated.
Here are two strategies for handling this:
1. Disable skipping fields in SurveyCTO Collect on mobile devices
For data collection using SurveyCTO Collect, go into Admin Settings (tap on the 3 dot icon in the top right), and under the USERS CAN ACCESS FORM ENTRY ITEMS section disable the option to Skip to Next. You may also want to disable the Go To Prompt option, which also allows skipping through the menu it opens. With these options disabled, your users will not experience any trouble with this programming method resulting from skipping fields.
| As always, when your data collection strategy depends on a particular configuration of SurveyCTO Collect settings, use the Admin Setting option to lock Admin Settings. Read more about device settings in our documentation. |
2. Prevent skipping fields through relevance
The above option works only for SurveyCTO Collect on mobile devices, but won't help with web forms given that at the time of writing this, the web form interface is not configurable (so you cannot prevent skipping or hide any options). What you can also do is prevent skipping fields using relevance.
It is possible to design a form section using the read only expressions suggested above so that each field is relevant only once the prior field has been answered. With this in place, if the user skips a field or enters the Go To Prompt menu, no field used as a read only expression condition would be relevant (so impossible to answer, avoiding the problem explained above).
So, using our sample form, the field "q3" might have the relevance ${q1} != null and ${q2} != null (neither "q1" nor "q2" is equal to "null"). "q1" and "q2" are required, so must be answered before the form can be finalized, and only once they've been answered can you answer "q3", which is also required.
Do you have thoughts on this support article? We'd love to hear them! Feel free to fill out this feedback form.
0 Comments